Creating Rotated Projects |
|
The use of rotated displays — monitors that display vertical media —
has become increasingly popular: you can see them in kiosks, presentations,
and even on the nightly news. If you have a project that you'd like to
display in a rotated format, Vegas makes it easy.
Create a new project.
-
Set your project properties
as needed, and then choose a setting from the Output
rotation drop-down list to indicate the orientation of your destination
display device. If you want to display your project in portrait (tall)
mode, choose 90° clockwise
or 90°
counterclockwise.
|
|
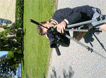
In this example, the video was shot with
the camera tripod rotated 90 degrees. However, because neither the project
or the media has been rotated, the video is displayed sideways within
the standard landscape frame. |
|
|
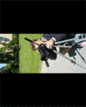
After choosing 90° clockwise
from the Output rotation drop-down
list, the Video Preview window is rotated. Because the media hasn't been
rotated yet, it doesn't match the project orientation and is letterboxed
within the frame. |
Add
your media files to your project.
Edit the properties for each of your media files
to set its rotation as needed:
a. Right-click a media file in the Project
Media window and choose Properties
from the shortcut menu. The Media Properties
dialog is displayed.
b. Choose a setting from the Rotation
drop-down list to indicate the direction you want to rotate your media.
|
|
After choosing 90° clockwise
from the Rotation drop-down list,
the media is rotated, and the video fills the frame. |
c. Click OK
to close the Media Properties dialog and save your changes.
 To rotate multiple files quickly,
select them in the Project Media window, right-click a selected file,
and then choose Rotate
90° Clockwise
or Rotate 90°
Counterclockwise from the shortcut menu.
To rotate multiple files quickly,
select them in the Project Media window, right-click a selected file,
and then choose Rotate
90° Clockwise
or Rotate 90°
Counterclockwise from the shortcut menu.
Drag your clips from the Project Media window
to the timeline to create events.
Edit
your project as needed.
Render your project to
any supported rendering format.
In the Render As dialog, select the Use
project output rotation setting check box if you want to use the
Output rotation
setting from the Project Properties dialog for your rendered file. When
the check box is cleared, the media is rotated according to its Media
Properties setting, but the project itself is unrotated—you can use this
setting to proof your project on an unrotated display.
To render a portrait-oriented file for viewing
on a computer without a rotated display, you can create
a rendering template that matches the proportions of your project:
a. Right-click the Video Preview window
and ensure Simulate Device
Aspect Ratio is selected.
b. Next, adjust the size of the Video Preview
window to match the frame size you'd like to render and note the Display dimensions in
the lower-right corner of the Video Preview window.
c. From the File menu, choose Render
As, choose the desired rendering format from the Save
as type drop-down list, and then choose a rendering template that's
close to the frame size you noted in step b. Windows Media Video is a
good choice.
d. Click the Custom
button, and then use the Video tab in the Custom Template dialog to adjust
the frame size to match the dimensions you noted in step b.
e. Save your template for later use.
f. Clear the Use
project output rotation setting check
box and render your file.