Applying Tags to Media |
You tag media by dragging a tag from the tag tree to a media file in
the Search Results pane (or by dragging a media file to a tag) when the
Apply Tag Mode
button ![]() is selected.
is selected.
![]() If you want to see which tags are associated
with a file as you're adding or removing tags, use the Properties
pane in the Search Results pane (or drag the Tags column in the Search
Results pane to the left so you can see the Name and Tags columns at the
same time).
If you want to see which tags are associated
with a file as you're adding or removing tags, use the Properties
pane in the Search Results pane (or drag the Tags column in the Search
Results pane to the left so you can see the Name and Tags columns at the
same time).
![]() Tags are saved in your media library. If a
media file exists in multiple libraries, tagging the media file in one
library has no effect on the other libraries unless you save the tags
to the files and use the Add Files to Media
Library dialog to update tags and custom properties for all files.
Tags are saved in your media library. If a
media file exists in multiple libraries, tagging the media file in one
library has no effect on the other libraries unless you save the tags
to the files and use the Add Files to Media
Library dialog to update tags and custom properties for all files.
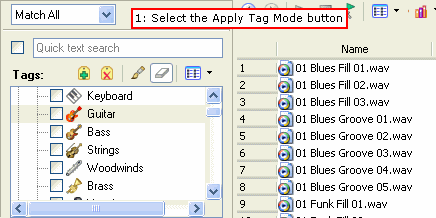
Perform a search to find the files you want to tag.
Select media files in the Search Results pane. Hold Ctrl or Shift to select multiple files.
Select the Apply
Tag Mode button ![]() .
.
Drag a tag from the
tag tree to the selected files. A tag icon is displayed on the selected
files to indicate the tag is being applied:
![]() You can also right-click a
selection in the Search Results pane and choose Apply
Tag from the shortcut menu to apply a tag to all selected media.
The Tag Chooser dialog will be displayed. Select the tag you want to add,
and then click the OK
button.
You can also right-click a
selection in the Search Results pane and choose Apply
Tag from the shortcut menu to apply a tag to all selected media.
The Tag Chooser dialog will be displayed. Select the tag you want to add,
and then click the OK
button.
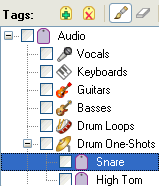
When you add a subtag to a media file, the tag's hierarchical position in the tag tree is applied implicitly.
|
|
In this example, adding the "Snare" tag to a media file would mean that a search for "Audio," "Drum One-Shots," or "Snare" would find your tagged media. If the user rearranged the tag tree so that the "Snare" tag did not appear below the "Audio" and "Drum One-Shots" tags, searching for "Audio" or "Drum One-Shots" would not find your tagged media. If you add all three tags to your media file, a search for "Audio," "Drum One-Shots," or "Snare" would find your tagged media even if the tag tree had been rearranged, though this behavior is not always desirable. |